


Buying a human hair wig is an investment. It’s not just a purchase; it’s a commitment to a look, a style, and a feeling of confidence. But sometimes, off the shelf colors just don’t match the vision in your head. Whether you want a fiery copper, a subtle balayage, or a jet-black refresh, knowing how to color human hair wigs correctly is the difference between a stunning transformation and a ruined, tangled mess.
While human hair wigs behave similarly to natural hair growing from your scalp, they lack the natural oils and regeneration capabilities of living hair. This makes them more susceptible to dryness and over processing. In this comprehensive guide, we will walk you through the elite techniques used by professional stylists to dye wigs safely, ensuring your unit stays soft, shiny, and vibrant.
Why Coloring a Wig is Different From Coloring Natural Hair

Before you mix your developer, it is crucial to understand the unique canvas you are working with. When you set out to color human hair wigs, you are working with hair that has likely already been chemically processed to achieve its texture and base color.
- Porosity: Wig hair is often more porous than natural hair, meaning it soaks up color faster and darker than you might expect.
- No Body Heat: Dye on a human head processes faster at the roots due to body heat. A wig on a mannequin head is cold, meaning the processing time will be longer or require a different approach.
- The Lace Factor: The most delicate part of your unit is the lace. One accidental drop of dye on the lace can stain it permanently, ruining the “scalp” illusion.
Preparation: The Key to Flawless Color
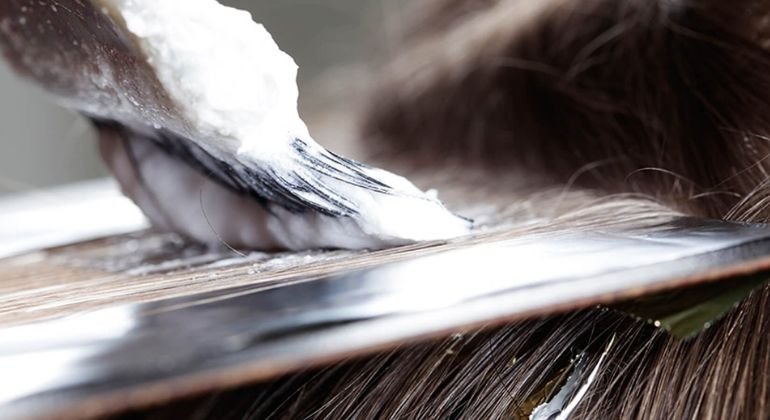
Success lies in the prep work. Do not skip these steps if you want professional results.
1. Choose the Right Wig
Not all wigs are candidates for color. Ideally, you should start with “virgin” or “raw” hair hair that hasn’t been chemically processed. If you want to go lighter (deposit vibrant colors or blonde), you must start with a 613 Blonde wig. Trying to lift a jet black (1B) wig to blonde at home is a recipe for damage. If you are going darker, a natural black or brown wig works perfectly.
2. Gather Your Arsenal
To color human hair wigs effectively, you need the right tools:
- High Quality Hair Dye: Avoid box dyes from the drugstore. Use professional tube color and developer or semi-permanent dyes (like Adore or Arctic Fox) for safer results.
- Developer: 10 or 20 volume for depositing color. Avoid 30 or 40 volume unless you are a professional, as it can burn the hair.
- Wig Stand and T-Pins: To secure the wig.
- Processing Bowl and Brush.
- Wide-Tooth Comb.
- Vaseline or Got2B Spray: To protect the lace.
- Gloves and Old Towel.
3. The “Lace Protect” Hack
This is the secret pro tip. To prevent the dye from staining the lace:
- Apply a thin layer of Vaseline on the inside of the lace cap.
- Alternatively, spray a layer of Got2B Glued freeze spray on the inside of the lace and let it dry. This creates a barrier that prevents dye from seeping through to the knots.
Method 1: The Watercolor Method (Best for Solid, Vibrant Colors)

The watercolor method has taken the wig community by storm because it is fast, creates an even tone, and is beginner-friendly. It works best when depositing color onto a 613 blonde wig.
Step 1: Fill a Basin Fill a plastic basin or sink with hot water (not boiling, but very hot). The heat helps open the hair cuticle to absorb the color.
Step 2: Mix the Color Squeeze a generous amount of semi-permanent dye into the water. Use a whisk to mix it until the water is completely opaque and no clumps remain. The darkness of the water determines the intensity of the color.
Step 3: The Dip Holding the wig by the tag or the inside of the cap (keeping the lace out of the water if possible), submerge the hair into the colored water. Lift it up and down to ensure the water penetrates every strand.
Step 4: Check and Repeat Within seconds to minutes, the wig will absorb the color. If it’s too light, add more dye to the water or leave it submerged longer. Once satisfied, rinse with cool water until it runs clear.
Method 2: The Traditional Brush Method (Best for Highlights, Roots, and Lowlights)
If you want dimension, a root melt, or highlights, you cannot use the watercolor method. You must hand-paint the hair.
Step 1: Section the Hair Secure your wig to the canvas head with T-pins. Divide the hair into four quadrants.
Step 2: Protect the Knots Be extremely careful near the roots. If you are darkening the roots (a “root tap”), use a small angled brush and apply the dye just above the lace, pulling it down slightly to blend. Do not press the brush into the lace.
Step 3: Apply and Saturate Working in small sections, apply the dye from root to tip (or wherever you want the color). Use your fingers to massage the dye into the hair strands this ensures there are no patchy spots.
Step 4: Process Let the color sit according to the manufacturer’s instructions. Remember, since there is no body heat, you might need to check it frequently. A plastic shower cap over the wig can help trap heat and aid processing.
Method 3: Bleaching (The Danger Zone)
Lifting color (going from dark to light) involves bleach. This is the most damaging process. When you color human hair wigs with bleach, you are stripping moisture.
- Do not bleach a wig that has already been dyed black; it will likely turn orange or melt.
- Do perform a strand test first.
- Do use a high quality bonding additive (like Olaplex) in your bleach mixture to protect the hair bonds.
Aftercare: Sealing the Deal
Once you have rinsed the dye out, the job isn’t done. Wig hair needs extra love to recover from the chemical process.
- Deep Condition: Apply a sulfate-free, moisture-rich deep conditioner. Let it sit for at least 30 minutes. This closes the cuticle and locks in the color.
- Air Dry: Never blow dry a freshly colored wig. The heat can cause further dryness. Place it on a wig stand and let it air dry naturally.
- Color-Safe Products: When you wash your wig in the future, use products specifically designed for color-treated hair to prevent fading.
Common Mistakes to Avoid
- Over washing: Wigs don’t get oily like natural hair. Wash your colored wig only when necessary to preserve the vibrancy.
- Using Box Dye: Box dyes contain metallic salts that can react poorly with wig hair, leading to unpredictable colors or severe dryness.
- Ignoring the Lace: Stained lace is very difficult to fix. Always prioritize protecting the lace grid.
Conclusion: Wear Your Creation with Confidence
Learning how to color human hair wigs opens up a world of creativity. You are no longer limited to the shades available in the store. With patience, the right products, and these professional techniques, you can create a custom unit that looks expensive, feels soft, and perfectly expresses your personal style.
Remember, if you are unsure, start with a semi-permanent dye it washes out, giving you room to experiment without the commitment.
Ready to try your new color skills? Don’t risk ruining an old wig. Start fresh with a premium quality, high density unit that takes color like a dream.
🔥Remember to visit our social media pages Hair Luxury now so you don’t miss out on the day’s deals!!!🔥
📲Phone/WhatsApp: +1 (206) 698‑5133
🛜Instagram: RAW HAIR LUXURY COMPANY
🌐Tik Tok: RAW HAIR LUXURY
📧 Email: Rawhairluxury.us
🌐Website: rawhairluxury.com


One Reply to “How to Color Human Hair Wigs: The Ultimate Professional Guide to DIY Dyeing”
Advantages and Disadvantages of Human Hair Wigs
[…] from a sleek blowout to loose curls and back again in the same week without replacing the unit. The guide to coloring a wig covers how far that versatility extends: a wig starting as virgin or raw hair can be professionally […]