Box braids have remained one of the most popular braided hairstyles for decades, thanks to their timeless appeal, versatility, and protective benefits. While there are countless braid styles to choose from, box braids continue to stand out for their ability to suit different hair lengths, textures, and personal styles.
Loved by many, especially Black women, box braids offer a stylish way to protect natural hair while reducing daily maintenance. Whether worn long or short, simple or accessorized, they provide a look that is both practical and beautiful.
Thinking about trying box braids yourself? In this guide, we’ll explore what makes this hairstyle so popular and walk you through how to create box braids at home.
What are Box Braids?
Box braids are easily recognized by their signature square-shaped sections, with each section braided individually from the roots to the ends. This iconic style is celebrated for its protective benefits, durability, and endless styling possibilities.
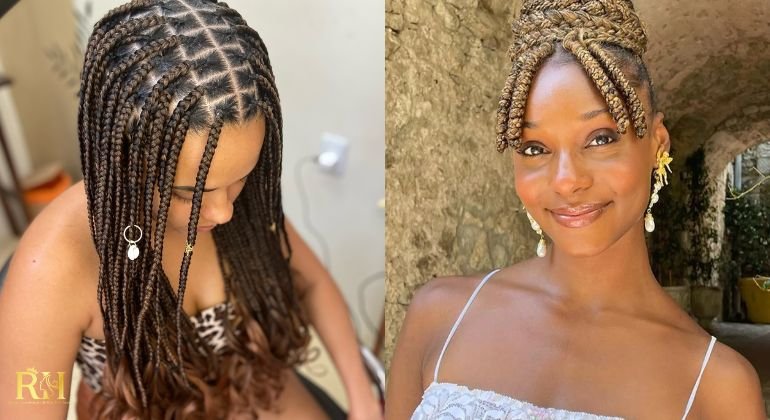
One of the biggest advantages of box braids is their versatility. They can be created using either synthetic or human hair extensions to add extra length, fullness, and volume. For a natural look, choose extensions that closely match your hair color. If you’re looking to make a statement, experiment with bold shades like burgundy, blonde, copper, or purple for a fun and eye-catching twist.
Whether worn in a classic style or customized with color and accessories, box braids offer a fashionable and low-maintenance way to protect your natural hair while expressing your personal style.
What Will You Need to Create Box Braids?
Before you begin creating box braids, it’s important to gather the right products and tools to ensure a smooth installation process and long-lasting results.
Shampoo and Conditioner
Start with clean, well-conditioned hair. Washing and conditioning your hair beforehand helps remove buildup, improve manageability, and reduce tangles, making braiding much easier.
Styling and Hold Products
A quality braiding gel can help create neat parts, smooth the roots, and provide a secure hold throughout the installation process. You may also want a lightweight mousse to keep flyaways under control and maintain a polished finish.
Frizz-Control Products
To achieve sleek, long-lasting braids, consider using products designed to reduce frizz and add shine. These can help keep your braids looking fresh both during and after installation.
Essential Hair Tools
A rat-tail comb is ideal for creating clean, precise sections, while a wide-tooth comb helps detangle hair without causing unnecessary breakage. Hair clips and rubber bands can also be useful for keeping sections organized and securing braid ends.
Hair Extensions
If you’re looking to add extra length, volume, or fullness, you’ll need braiding hair extensions. Whether you choose synthetic or human hair, opt for high-quality extensions that are lightweight, durable, and comfortable enough to wear for several weeks.
How to Do Box Braids: A Step by Step Guide
Let’s now move on to the detailed step-by-step guide on creating box braids!
Step 1: Prep Your Hair

Wash your hair:
Start by washing your hair with a clarifying shampoo to remove dirt, excess oil, and product buildup. Follow with a deep conditioner to restore moisture, strengthen your strands, and improve manageability. If your hair is prone to dryness or frizz, apply a leave-in conditioner for added hydration and protection.
Detangle and Stretch Your Hair:
Once your hair is clean and conditioned, gently detangle it using a wide-tooth comb, working from the ends upward. Apply a heat protectant throughout your hair, then blow-dry on a low to medium heat setting to stretch the strands. This step makes parting and braiding much easier, especially for natural, curly, or coily hair textures.
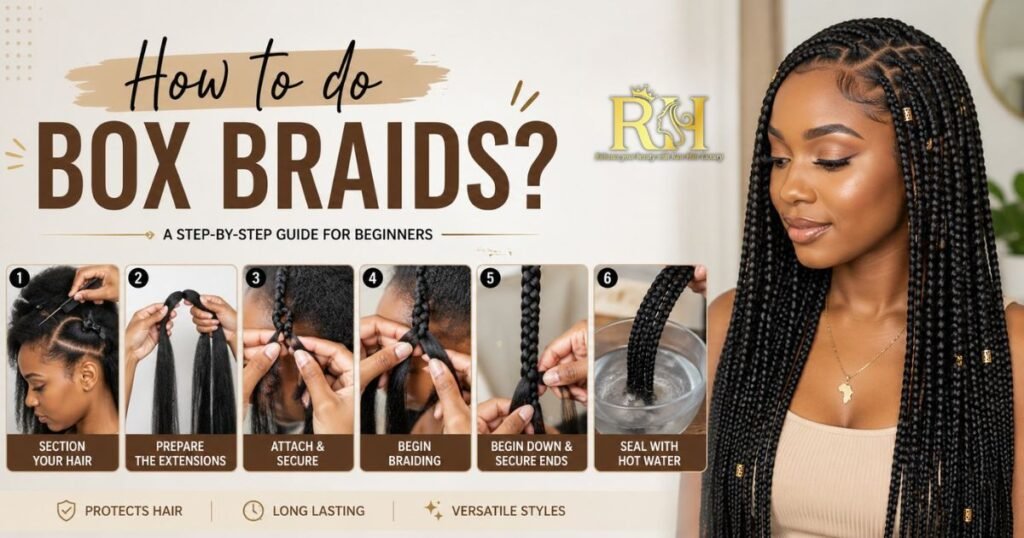
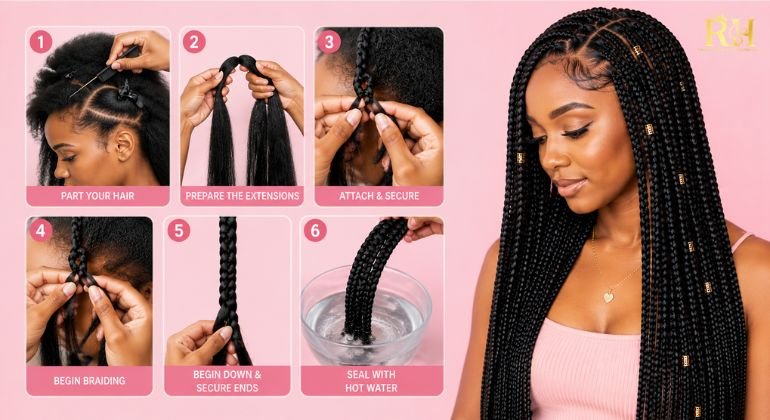
Section Your Hair:
Using a rat-tail comb, divide your hair into four large sections—one from forehead to nape and another from ear to ear. Secure three sections with clips, leaving one section loose to work on.
Next, use the pointed end of the comb to create clean, square-shaped parts. Smaller sections will produce traditional box braids, while larger sections can be used for jumbo box braids. Taking the time to create neat, even parts will help give your finished style a professional and polished appearance.
Step 2: Braid in Hair Extensions
If you plan to add extensions which is the most common choice for box braids have enough braiding hair on hand before you begin. Depending on the length, thickness, and size of your braids, you may need several packs of synthetic or human hair extensions. It’s always a good idea to purchase a little extra, as any leftover hair can be used for future styles.
-
Apply Styling Gel
For a sleek and polished look, apply a small amount of braiding gel or styling cream to the roots of the section you’re working on. This helps smooth flyaways, create cleaner parts, and keep the braid secure. Gently brush through the section to distribute the product evenly.
Next, divide the section into three equal strands, preparing it for the braiding process.
Pro Tip: If you’re creating knotless box braids, begin braiding with your natural hair first and gradually feed in the extensions. For traditional box braids, add the extension hair at the root and braid it in from the start.
B. Prep The Braiding Hair Extensions
- Section the braiding hair extensions
Take a section of braiding hair slightly thicker than your natural hair section. Split it into two uneven pieces one larger section and one smaller section to help create a natural, seamless braid.
- Fold to get three strands
Cross the two extension sections and fold the smaller section back over itself. This creates three strands of hair with a balanced thickness, ready for braiding.
- Hold all sections and get ready to braid
Hold the extension securely at the loop with your thumb and forefinger. Choose one of the three extension strands as the center strand, position the loop at the root of your natural hair section, and combine the center strand with your natural hair to begin braiding.
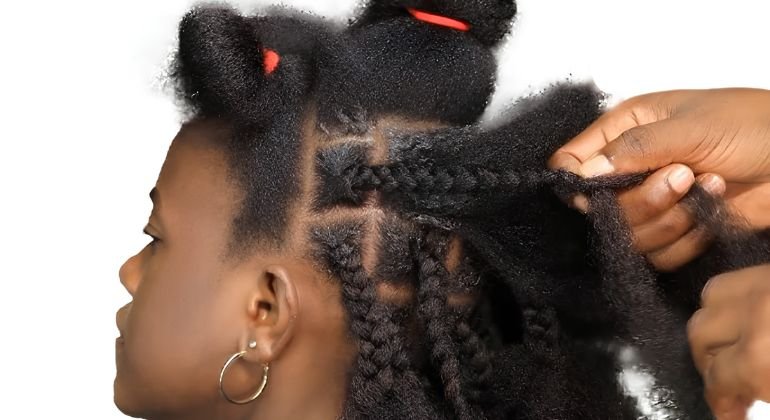
C. Braiding in hair extensions
Begin braiding by alternating the outer strands over the center strand, working your way down the length of the hair. Continue until you reach the ends, then secure the braid with a small rubber band if needed.
Repeat the process for each section until your entire head is complete. For easier installation, start with the back sections and gradually work your way forward. Since box braids can take several hours to install, feel free to take breaks between sections to stay comfortable and maintain neat, consistent braids.
D. Perfect your braids
Once all your braids are complete, carefully trim any stray extension hairs to create a cleaner, more polished look.
For a smooth finish, dip the mid-lengths and ends of the braids into hot water for a few seconds. This helps seal the ends, tame flyaways, and reduce frizz, leaving your box braids looking sleek and neat.
Tips to Keep in Mind While Braiding Your Hair
- Moisturize your scalp before and during wear to keep your hair healthy and hydrated.
- Take time to create neat, even sections, as clean parting is key to beautiful box braids.
- Avoid braiding too tightly, which can cause scalp tension, discomfort, and potential hair damage.
- Protect your braids at night by wrapping them with a silk or satin scarf to minimize frizz and maintain a neat appearance.
- Personalize your look with braid cuffs, beads, or other accessories for added style.
- Use lightweight leave-in conditioners or braid sprays as needed, but avoid excessive product application to prevent buildup.
How to Remove Box Braids?
When it’s time to take out your box braids, patience and proper care can help minimize breakage and keep your natural hair healthy.
Start by lightly misting your braids with warm water and applying a detangling product to add slip. Work in small sections to keep the hair manageable and prevent it from drying out during the removal process.
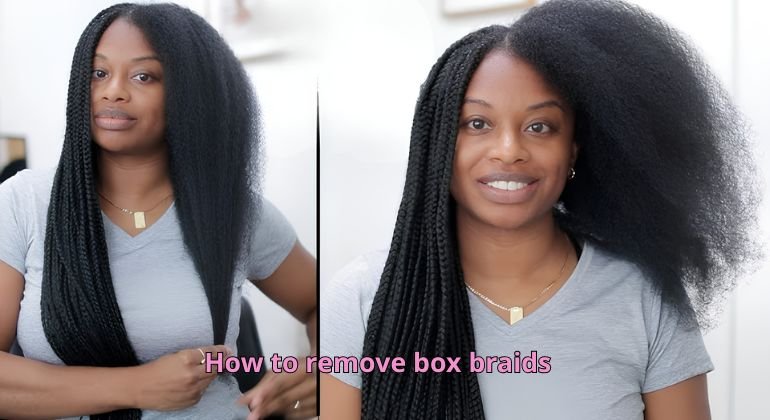
If you used extensions, carefully trim the braided ends below where your natural hair stops. Then, gently unravel each braid from the bottom upward. Apply additional detangler as needed and use your fingers or a wide-tooth comb to remove shed hairs and tangles as you work toward the roots.
Once all the braids and extensions have been removed, thoroughly cleanse your hair and follow with a deep conditioning treatment to restore moisture and strength. Giving your hair a short break before your next protective style can also help maintain its overall health and resilience.
Conclusion
Box braids remain a favorite protective hairstyle thanks to their versatility, durability, and timeless appeal. While installing them at home requires patience and time, the results are often well worth the effort.
To keep your hair healthy, avoid leaving box braids in for too long. When you notice excessive frizz, buildup, or loosening at the roots, it’s time to remove them. After taking your braids out, give your natural hair some extra care with cleansing, deep conditioning, and a short break before your next protective style.
With proper installation, maintenance, and removal, box braids can help protect your natural hair while keeping you looking stylish for weeks.
Ready to find your perfect match? Contact us today for expert advice and exclusive discounts on premium human hair extensions.
📲Phone/WhatsApp: +1 (206) 698‑5133
🛜Instagram: RAW HAIR LUXURY COMPANY
🌐Tik Tok: RAW HAIR LUXURY
📧 Email: Rawhairluxury.us
🌐Website: rawhairluxury.com